This blog contains information and updates for Quilts by Barb, Barbara Raisbeck, owner.
2013 Quilt Retreat Getaway Weekend is scheduled for November 8, 9 and 10, at The Quality Inn Hotel and Ballroom in Mineral Point, Wisconsin.
2013 Hand Dyeing Workshop is scheduled for June 17, 2013.
Check out details and registration at www.Quiltsbybarb.com
Monday, April 30, 2012
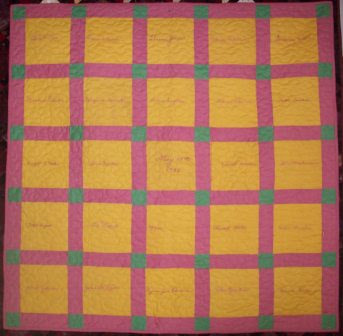
Every Quilt Tells a Story - Belmont High 1932
I have been working on a most unusual quilt. Monica Bartels and I are both in a quilting group with a number of other wonderful ladies.
Monica's Mother, Marguerite Keyes passed away this year at the age of 98 years old. When Monica was cleaning out her Mother's home she came across a brown paper bag with chrome yellow squares with embroidery names in bubble gum pink stitching. On closer inspection Monica realized these squares were traced autographs from the Belmont High School class of 1932. This would be the 80 year class reunion!
Apparently Marquerite gathered the signatures and embroidered over them. Monica thinks a couple of the signatures may have been teachers. One of the signatures, Vincent Donahoe, was my father. Another, Cecilia Donahoe, was my aunt, Dad's sister.
All the fabric is original from 1932. The blocks were in the bag and I cut the sashing blocks. The fabric was 36" wide. The blocks were cut at 7" squares (remember rotary cutters weren't used in the 30's) and when our quilting group assembled the quilt top, I didn't do any squaring up on the blocks. I kept reminding them they were working in the 30's! I did starch and press the blocks before sewing.
What are we going to do with the quilt? Only one student from the class is still alive. Helen Buss was a school teacher in Belmont, still lives in Belmont and is in good health. Monica is going to present the quilt to Helen Buss to use as a lap robe.
Can you tell this was an exciting meaningful project for me????
Here are pictures of a few of the blocks:
Monica's Mother's block: Marguerite Nodolf - Marguerite Keyes. Marguerite did the embroidery and carried the blocks all over the country to a number of different stated that her and her husband, Don, lived in over the years.
Helen Mary Buss's block: Helen will be the recipient of the quilt. Helen never married so she is still Helen Buss.
Vincent Donahoe's block: This was my Dad. Notice the writing in the selvedge. It stated the fabric was colorfast and it is. The pink is that wonderful bubblegum pink and the green is that great green from the 30's. The chrome yellow is as bright as the day it was purchased.
Dad's signature looked the same in 1932 as it did when he passed away at the age of 88!
My aunt's block, Cecilia Donahoe. Cecilia and Dad were brother and sister but they were not twins. Cecilia never married and lived in Darlington most of her life.
Dwight Mille'sr block. Our family and Dwight's family grew up a few miles from each other and we all attended Pleasant View School together before we attended school in Belmont.
Charles Rowe's block. Charlie owned Rowe's Tavern in Belmont for a number of years. I worked with him one summer when I was in college at Belmont's First Capital State Park.
I hope you enjoyed my little journey with this quilt. Every quilt tells a story!
Happy Quilting.
Barb
Sunday, April 22, 2012
Finishing the ends on quilt bindings
Greetings all,
I just returned from a fabulous few days of quilting. As a quilt teacher, I can never just sit quietly when I have an opportunity to help a fellow quilter. I saw someone struggling with joining the end of their binding strips and offered to share with the group an easier way to join the end of their binding strips.
I would like to share with you the steps to do this:
Step 1: Sorry this picture is sideways. I am a quilter; not a computer techie!
When starting your binding, leave an approximately 6 inch tail unsewn. Sew all the way around the quilt until you are approximately 6 inches from the starting end of the binding. Stop sewing at this point.
Step 2: Measure from the END of your starting strip. This is where the pin is in this picture. The formula for your measurement:
the width of your binding plus 1/2 inch = where you will cut the end of your binding strip. In the picture, Flo's binding was three inches wide when she cut it. She added 1/2 inch so she is cutting off the end of her binding strip at 3 1/2 inches.
Step 3: Lay the end of the binding strip flat. Overlap the starting tail of your binding at right angles on the top of your ending strip. Leave 1/4" overlap on both binding strips end. This is exactly the same as when you are sewing your binding strips together end to end.
Step 4: Sew from the outside edge of the binding corner where the two strips overlap to the inside corner where the binding strips overlap. You may eyeball this or you may draw a line to sew on.
Step 5: Cut your thread and TEST to be sure your binding is the proper size and that you sewed the right corners. Your binding should now fit perfectly with the edge of your quilt. After you have tested this, trim off the corners of your binding strips and press the seam open just like you would when you join your binding strips end to end.
Pin the approximately 12" space where your binding in not sewn to your quilt. Sew this with the same seam allowance you have used when sewing on you binding.
You now have the perfect beginning and ending seam on your binding.
Thanks to Phyllis for taking the pictures and encouraging we to write this tutorial. Thanks to Flo for being our model!
Happy Quilting. Barb
Sunday, April 15, 2012
Connie's Fishing Quilt
This is another fun quilt I sent out recently. I don't do very much applique so I really appreciate just how much work it is. This is a full view of Connie's quilt.
Here are some closeups so you can see all the fun details she added.
The frog in the corner with the grasses and lily pads.
And we have a turtle in the other corner.
A tree extends into the quilt from an upper corner.
And in the center they are fishing in the lake.
This is just one of the fish blocks. I used a ray type quilting in the fish blocks. In the background I used a free form lazy meander to resemble the wind or breeze. All the applique was outlined in free form applique outlines. The large blue border was quilted with soft piano keys.
Thanks for sharing another great quilt with me.
Barb
Labels:
applique,
fish quilt,
heirloom quilting,
machine quilting
Friday, April 13, 2012
Linda's Quodlibet Quilt
Judy Hasheider of Quilt with Judy designed the pattern Quodlibet. The quilt is normally made with a black or dark sashing or leading fabric.
Linda changed her sashing fabric to white and used an orange color theme. The fabric choices throughout her quilt are amazing. I recognize a number of the fabrics as hand dyed fabrics from Quilts by Barb.
Judy's original pattern is show above. The pattern for this quilt is available at www.quiltwithjudy.com
Linda said this quilt just continued to grow. She added two pieced borders and two plain borders. When quilting the quilt, I treated the inner pieced border as paft of the inside of the quilt. I used a peach colored thread throughout all the quilting on the quilt. It shows, but blends nicely with both the inside of the quilt and the borders. This quilt has very sharp geometric designs so I used modern, fun circular designs in the quilting.
I just kept taking pictures of this quilt! There was so much fun stuff to see. I just love the colors.
For those of you who attended the 2011 Quilt Retreat Getaway Weekend sponsored by Quilts by Barb, can you pick out the Yard that Keeps on Going??
Linda hasn't even seen her quilt yet since I completed the quilting. I will be delivering it to her next week.
Thought you would enjoy sharing another beautiful quilt with me.
Happy Quilting!
Barb
Thursday, April 12, 2012
Judy's I Spy Quilt
I have been working on some great quilts lately. Today I am going to show you Judy's quilt that she made for her grandson, Max.
A close up. Note the picture Judy added. |
This also shows a picture and some of the fun blocks. She used a very simple snowball setting for the blocks. |
A full length view of the quilt. I did an all over meander or "Bare Bones" quilting on it.
Works great for kids quilts.
The back is as fun as the front. She used up the left over fabrics and
put strips of them on the back of the quilt.
And, get a load of that wonderful label on the back of the quilt.
That is a picture of Judy with her grandson, Max.
Just thought this was too great to not share.
Happy Quilting! Barb
Labels:
bare bones quilting,
machine quilting,
meandering
Subscribe to:
Posts (Atom)