Kim’s Crafty Apple
My Tilted
House
By Barbara Raisbeck, Quilts by Barb
My fabric
choices: I am using mostly overdyed fabrics for my “Home Sweet
Home” quilt so I selected them for this block also. I will tell you a little more about overdyed
fabric at the end of this tutorial.
Fabric 1: The house – I used a nice rich purple
Cut: (1) 2 ½” X 10 ½”
(3) 2
½” X 4 ½”
(1) 2 ½” square
Fabric 2: The door and chimneys – I used a red with
gold sparkles
Cut: (1)
2 ½” X 4 ½” for door
(2) 2 ½” squares for chimneys
Fabric 3: The roof – Brown with a design that looks
like shingles
Cut: (1)
2 ½” X 6 ½”
(2) 2 ½” squares
Fabric 4: The sky – A grayed/blue that looks like sky
Cut: (5)
2 ½” squares
Fabric 5: The window – I used a lime green like
reflecting light
Cut: (1)
2 ½” squares
Fabric 6: The frame – I used a reddish orange strip
that really framed my house.
Cut: (4) 2 ½” X at least 13”. I used a fat quarter and cut (4) widths of the fat quarter.
Lay out your house pieces in
rows as pictured.
Row
1: sky-chimney-sky-chimney-sky
Row
2: sky/roof-roof-sky/roof
Row
3: house
Row
4 & 5:house-door-house-window/house-house
First we are going to combine
the roof and sky together into half square triangles. I wanted to cut all my pieces at 2 ½” width
so I am using a little different method.
Draw a line down the center of wrong side of your sky fabric. Put sky and roof fabrics, right side together
and sew ON THE LINE.
After you sew on the line,
trim ¼” from the line. Note your tails
are already trimmed. Press triangles
open toward the sky fabric. Make (2)
sets of these half square triangles for the edges of your roof. Put these back in place in your house lay
out.
Next we are going to sew the
rows together just as we have them laid out.
Starting at the top of your house:
Sew Row 1. Press your seams toward the chimneys.
Sew
Row 2. Press the seams toward the half
square triangles.
Row 3. Just leave until we need it.
Row 4/5 – Sew window to top
of house square. Press toward
house. Then sew pieces together from
left to right. Doesn’t matter which way
you press your seams.
In the picture I have sewn my
1st and 2nd completed rows together. Press seam toward chimney row.
Continue to add row 3 and 4/5
to house. Doesn’t matter which way you
press your seams.
Congratulations, you have a
house! The house should measure 10 ½”
square, but guess, what; it doesn’t matter if it is a little large or a little
small; we are going make it a tilted house.
I forgot to take a picture of
my finished house so this is cropped out of the house with border picture. You will have a seam allowance of ¼” by your
roof edges. My mistake; I was too excited
to tilt my house!
Now we are going to border
our house and tilt it. Sew one of the 2
½” strips to the top and bottom of your house.
Press the seams away from the house and trim the ends even with the edge
of your house.
Now sew the last 2 ½” border
strips to the sides of your house. Press
seams away from house. Isn’t it fun!
Take your large square, I
used a 12 ½” square, and lay it on top of your block. Tilt the square anyway you want as long as
you don’t cut off your house. I try to
stay at least ½” away from all edges of my house.
Cut on all four sides of your
square. If you are using a larger than
12 ½” square, cut the finished house block to 12 ½”.
PRINT your own PDF instructions of this block by clicking HERE.
A little more about this block: I use this method of tilted blocks a lot. I love it for making T shirt quilts or orphan block quilts. Chose something to coordinate the blocks and you have a lovely quilt.
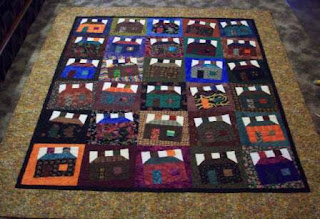
This is a completed quilt that was made and donated at the 2009 Quilt Retreat Getaway Week using the house block from this tutorial. It now hangs in the Baymont Inn Convention Center in Belmont, Wisconsin.
This is an orphan block quilt that was made from quilt blocks donated by participants at the 2011 Quilt Retreat Getaway Weekend. The blocks are set using the tilted method in this tutorial. It was given to Marissa, a young girl who was in a car accident.
A little
about overdyed fabric: Overdyed fabric is regular commercial fabric
that has been scoured and then overdyed with procion dyes. I have done a lot of this type of fabric
dyeing in the last couple of years and found it brings new life to some fabrics
that were just so-so.
Owner of Quilts by Barb
Please
visit me on the web to learn more about our 10th Annual QuiltRetreat Getaway Weekend and our Summer Hand Dyeing Workshop that we are holding
at Lapacek’s Orchard. We would love to
have you join us at either event!


No comments:
Post a Comment