Wednesday, May 30, 2012

A Radiant Star with a Mariner's Compass

Wow, Leigh has another amazing quilt.  I just love the color and fabric choices on this quilt.  The compass with the radiant star is such an unusual combination and it works so well together!  This is a quilt I am putting on my to do list.


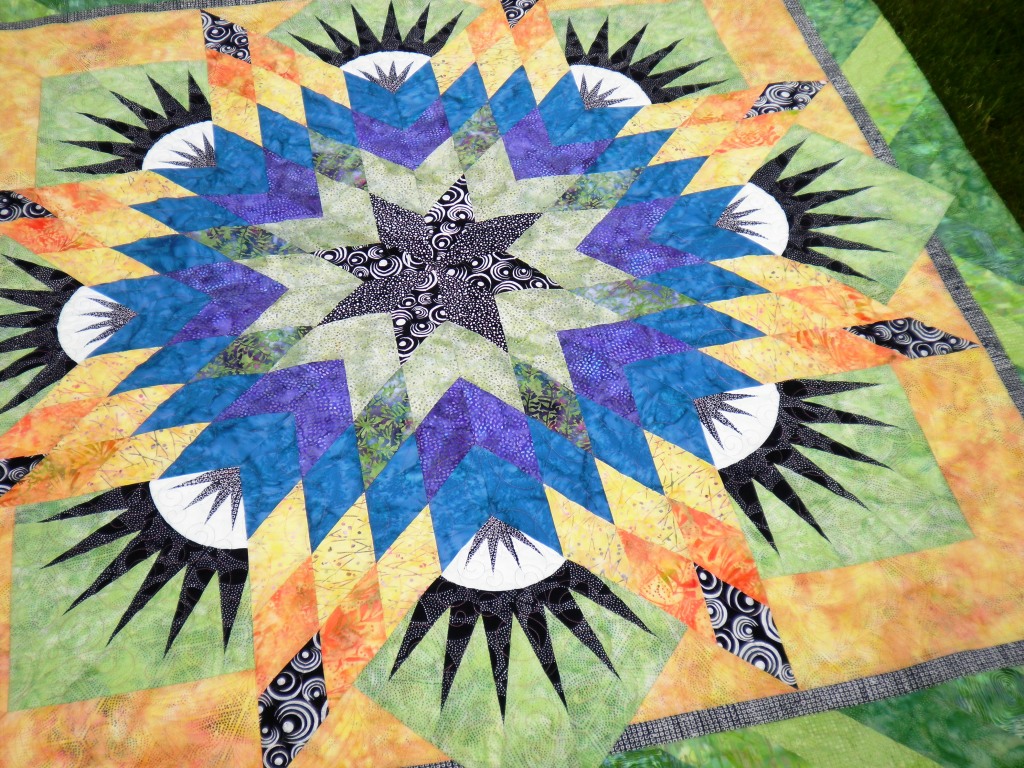
I knew it would be hard to get pictures of the quilting on this one as I used a light orange Bottom Line thread from Superior on all the quilting.  I didn't want to thread to shout "Quilting" and I achieved what I was after.  The compass is fun and quirky with the radiant star so I wanted the quilting patterns to be a large contrast, too.  I used a swirl in the compasses and then put ferns in the surrounding inside borders.  Made just the contrast I was after.


On the borders I did a squiggly line following the diagonal piecing and then added one more line between the lines on the piecing.  This makes a really nice contrast in textures to the ferns and swirls on the inside of the quilt.


I wish the star quilting could have shown up better but it doesn't.  I used the "Terry Twist" set at .8 of an inch (that means something to you Statler Stitcher users) and just went from p2p all the way around the star in a counterclockwise circle.  This kept the twist going in the same direction.  The twist goes outside the diamond and it justs really works great.  These diamonds are cut at 3" widths so the larger twist really helps to fill the space and keep the inside of the diamond from getting baggy.  I don't like the baggy look!


It was just hard to quit taking pictures of this beautiful quilt.


And another a shot to show off those great fabric combinations.

It is always fun to work on Leigh's quilts.  She gives me the go ahead to do as I want on them and I really push the limit sometimes.  I love it!

Happy Quilting.

Barb

Tuesday, May 29, 2012

Thread Painting on a Landscape Quilt


I have had this beautiful Wyoming landscape quilt for a while and was a little nervous about working on it.  It was very stiff through the middle of the quilt because of the amount of fusible that was used during quilt construction.

I loaded the backing, then a layer of a fairly stiff stabilizer and then a thin layer of polyester batting and then the quilt top.  This really works nice.  There was no stiffness in the edges, the sky and the border and the stabilizer will help this quilt to hang as flat as a picture.


Leigh did a beautiful job of fabric selection when making this quilt.  Here you can see a close up of some of the rocks and the different blues in the water.  I did a flowing meander for all the water.  I outlined with different brown threads on the rocks.


i did a lot of thread painting, fairly dense, on some of the pine trees and a little looser on the lighter green area.  I did a raw edge applique straight stitch around all the pieces so none will ever come loose. 

I started by using invisible thread and basted the edges all flat and top stitched in the ditch around the borders.  I stitched in the ditch around some of the applique to keep everything square before I started the heavy thread painting. 


I stitched the wood bark on the tree trunk and you can see some of my stitching on the rocks by the tree.  I used four wavy lines in the border.  I wanted to keep a consistent amount of quilting but didn't really want my quilting to show in the border.


I really had fun with the snow capped mountain.  I started by just outlining the detailing and kept the white flowing.  I used a purple variegated thread for the mountain top and it really worked great.

This quilt turned out far better than I even hoped.  It is going to hang as flat as a picture and to me that is the number one requirement for a landscape quilt.

I still have one more of Leigh's landscapes left to quilt.  After this quilt, I am excited to complete the "Forest Landscape."

Happy Quilting! 

Barb

Monday, May 21, 2012

Farmer's Wife Quilt

The Northeast Iowas Quilt Guild has been working on the Farmer's Wife Quilt.  I finished quilting Carolyn's quilt today.  It is wonderful!


This is a full view of the quilt. 


All the blocks in the border were 6 inch blocks set on  point.  I quilted a crosshatching in each of the blocks and a feather in the setting triangles.


This is the center of the quilt.  Each of these blocks measures at 3 inches.  I did a crosshatching in each of these tiny blocks to make it a mini of the 6 inch blocks.


This shows the crosshatching in the blocks.  The sashing strips and squares each have an X sewn through them.  The quilt has wool batting so there the quilting definition shows nicely on the actual quilt.


The setting triangles in the "mini" part of the center is quilted with a small feather triangle.

Carolyn has made an heirloom quilt.  It is beautiful.

Happy Quilting.  Barb


Sunday, May 20, 2012

2012 Quilt Retreat Getaway Weekend

Our main project for the 2012 Quilt Retreat Getaway Weekend is "Celebrations" by Marilyn Foreman.  We are adding a twist to her fantastic pattern by adding kaleidoscope blocks from a great print fabric to some of her blocks.  First, here is her pattern as printed:


Now here are a few examples of different quilts using the kaleidoscope blocks in the quilt:


This is a closeup of just the center of the quilt.  Below is the fabric I used to make my blocks:


A medium to large graphic print really works the best.  You don't want too much background in your print.  I prefer to have a lot of different colors.

This quilt has an oriental fabric for the blocks.  The colors are very soft but still very effective.


Barb and Toni were two of my "testers" on this pattern.  Toni used a very bright print for her quilt.  Barb's fabric had fewer colors with a light background but really turned out great.


This is Barb's when she was assemblying it.


A full view of Toni's quilt.  She used a lot of  brights and her orange was last year's Yard that Keeps on Going.............


Tish's fabric had a lot of dark fabrics.  The star fabric is her own rust dyed fabric.

Below are some fabrics I found on Hancock's of Paducah that would really work well for this project.


It doesn't have to be floral although floral works great.

I would also like to share the following links on fabric selection for this quilt:

Connecting Threads - Selecting fabric for kaleidoscope quilts - This is a tutorial that has a lot of good information on your fabric selection. 

Quilt Moments - This is the webpage for Marilyn Foreman's patterns.  Take a look at her quilts.  She uses the same fabric for the outside border on a lot of her quilts that she uses to do her kaleidoscope blocks.  She uses a lot of florals.  I hope to have many of Marilyn's patterns for sale at the retreat.  She writes a great pattern.

After you have chosen your main fabric, read through Diane's advice in your registration packet on selecting other fabric to go with your focus fabric.  We will also have a lot of hand dyed fabric that works great as accent fabrics with your focus fabric.

If you are looking at a fabric and are not sure,  you may email Diane or I a picture of it and we would  be glad to let you know how it would work.

If you have any questions, please contact us.  We are very excited about this great project for our November retreat.  See you then.

Barb


Thursday, May 17, 2012

Sampler Quilt

Today I finished a small sampler.  Mary didn't want to spend the money on custom quilting for this quilt.  I think our solution for Design Quilting is fantastic.


Mary set her quilt with a pieced block and then a red print plain block.  We choose an overall curlque design for the quilt.


For thread, we used a medium gold thread.  This is my most used thread color as it blends beautifully with both the pieced blocks and the plain block.  It doesn't distract from either block.


Another close up a block.


And here is a picture of the full quilt.  Mary added a matching border to the blocks set on point so the blocks "float on the red."  This is a great setting for sampler quilt.

Great job, Mary.

Happy Quilting

Barb


Tuesday, May 15, 2012

Bear Paw Quilt

Just thought I would share a few pictures of a wonderful quilt I just finished quilting this morning. 


This is a close up of the center.  I wish you could see the quilting but I just couldn't get it to show.  I used a modern feather design in the large center block and then cross hatched the rest of the center medallion.


The center was surrounded by a larger bear paw block.  I used the same modern feather pattern here.


The borders had a wonderful pieced diamond.  I used a coordinating modern feather in these and then crosshatched on the outsides of the diamonds.  Was very effective.


 Another corner shot.  This really shows the true colors of the quilt.


And a full length view of the entire quilt.  Nicely done, Connie!

Happy Quilting.

Barb

Saturday, May 12, 2012

2012 Hand Dyeing Workshop


When: Monday, June 18, 2012,   9:00 AM to 4:00 PM

Where: Lapacek’s Orchard, N1959 Kroncke Rd, Poynette, WI

PLEASE NOTE:  This is a NEW location. 

If you’re a beginner or an advanced dyer, this workshop is for you.  The format is very relaxed.  Each participant chooses her (or his) own colors, materials and methods.  We provide help as needed.  Advanced dyers will be able to jump right in and start dyeing while beginners learn the basic procedures to get started.  We will be working outside (or in a LARGE shed in case of rain) and there will be LOTS of room.  You can dye as much or as little as you’d like.

A few of the topics that will be covered:

The basic procedures involved in dyeing cotton fabrics using fiber reactive dyes
  • Color gradations within a color family
  • Color gradations from color family to color family
  • Color wheels
  • Techniques to create visual texture and one of a kind fabrics
  • Learn how to make "convergence fabrics" just like Barb and Diane

Interested in dyeing things other than cotton fabric?

  • We will have blank white T shirts in many different styles and sizes for sale the day of the workshop.
  • We will have a selection of onesies, dresses and rompers for your little ones.
  • We will also have PFD fabric for sale by the yard or by the bolt.
  • Interested in trying to dye silk? We will have some!
  • Want to dye fibers for embellishment?  We’ll have some of them, too.

    Bring other items from home and we will help you dye them. Think old table linens, crocheted doilies, kid's socks. The fun is just starting! The methods we use work with cellulose (plant based) materials or silk. No wool.  (That’s an entirely different process.)  Think cotton, linen, rayon.  Blends will also work as long as they include some cellulose fibers.  If you’re in doubt, bring it along.  We’ll advise you.

Workshop cost: $55

The workshop fee includes all instruction for the day and lunch.  Supply cost will be $9.00 for each yard of cotton PFD.  This includes the fabric, dyes and other supplies needed.  If you purchase other items or bring them from home, we will weigh them and charge for dye supplies according to the weight of the items.

Supplies will also be available for purchase if you’re interested in dyeing at home.

A $25 nonrefundable deposit will be paid at time of registration to reserve your spot. The balance is due the day of the workshop.

For more details and registration:

Quilts by Barb 2012 Hand Dyeing Workshop

We would love to have your join us!

Barb


Tuesday, May 1, 2012

T Shirt Quilts

I have to share the story of Kassandra and her T Shirt quilt.


Step 1:  the box arrived in the mail.


The T shirts arrived and they were so beautifully folded.  She had every shirt marked exactly what she wanted in her quilt.  This girl is organized!


Step 2:  Kassandra didn't want anything to detract from the shirts and they were a lot of different colors.  Her choice of coordinating colors:  Black and White.  This was a first for me and it worked great.


Step 3:  I interfaced all the T shirts and did a trial layout to get a feel of what would fit where.  Kassandra had a lot of shirts and I wanted to use them all if possible.


Step 4:  I combined the sashing fabrics with the T shirts, moved things around a little and I had


A FINISHED T SHIRT MEMORY QUILT!

Step 5:  I received the most thoughtful letter from Kassandra and I just had to share it with you.  This really made my day!


Barb,

"This quilt is beyond perfect; it is everything I had hoped for and so much more.  I don't think you have any idea how very much this means to me.  You did an awesome job and certainly have a vision for this sort of thing.

Although it sounds sort of cheesy, all of these T-shirts were associated with memories for me.  Although I know that high school will by no means be the best part of my life, there were a lot of things that I enjoyed, and I know I really built a strong base for myself there, from which I'm sure I will be more comfortable off at school.  I'm sure one day when I'm missing some home-cooked meals I'll stare at it longingly and it will be a great comfort.

When my sister had the idea I was beyond excited.   My T-shirts were getting worn out but I was too sentimental to get rid of them.  At first we considered, being the crafty people that we are, attempting to make it ourselves, but I quickly nixed the idea, not wanting our first half-cocked attempt to ruin my T-shirts forever.  This was definitely a job for the professionals, and I could not have picked anyone better, nor would I ever go to anyone else in the future for something so important to me.

So thnk you Barb, from the bottom of my heart, I love this quilt more than I can put into words, and it means so very much to me.  You are truly a miracle worker.

With the upmost appreciation, always,"

Kassandra

How's that for appreciation from a HIGH SCHOOL girl who will be graduating this year!!!  Congratulations, Kassandra in whatever your future plans are.  I am sure you will go far. 


I will be teaching a T-shirt making class at the Quilt and Sewing Expo at UW Platteville this summer.

Check it out here:  http://www.uwplatt.edu/cont_ed/sewing_expo/index.html

Barb